Showing posts with label Gifts. Show all posts

Monday, September 23, 2013

Preschool Backpack!


It's been a whirl-wind of a time here at the MCD house.  We've had family and friends over and I've been sewing and crafting a ton!  One of the most recent projects has been the oh so beloved backpack.

G started preschool this year!!!


And although G and I were super-duper excited about this little adventure...a certain little someone else, was not...


Poor Claire Bear.


But G and I couldn't have been happier!  It was time.  She is so beyond ready and I need a little more one-on-one time with my little pouty-lipped, fire-cracker of a two-year old.  Because believe it or not, the little baby doesn't require the most attention, it's G!  G won't play by herself to save her life!  And she's oh so sensitive, which I love, but it can be tough and can require a bit of time and a truck load of patience since I'm trying to raise a human being...not a hot mess.


 I just love that photo.

Since G was starting Preschool, we needed a backpack!  And when I say I looked, I mean I scoured the internet, looked at all the department stores and came up with only two that I even remotely wanted.

The first choice was this one from Joo of BaggyBags...


Needless to say, I was in love with this bag.  Unfortunately, no embroidery and we were required to have her name on the inside, outside and top of her bag.  This bag is just too pretty to do that to.

If you are looking for an amazing bag with beautiful neutral colors, classic shapes and clear-cut quality...Joo of BaggyBags is phenomenal.  I know I'm about to purchase something for myself from her...however, I can't choose which one I love the most.  She's that good.

Second choice and the one we almost got was from Pottery Barn.  The only reason we didn't get it was because I wouldn't have received it until the end of October!!!

Therefore, instead of letting G get swallowed by a slew of plastic and poly...I made the trepidatious decision to make her backpack.  *ooohhh....gasp*

I got a couple folks who asked "Are you crazy?" and "why?" and "Really?"

Yes...I'm kind of nuts sometimes.

But, let me tell you how wonderful this experience was.  This was by far my most complicated project I have ever taken on.  And I came out singing!

Take a look!


First, lets talk fabric.  This fabric is absolutely too cute!!!  I found it at my new favorite fabric shop, Sewn Studio.  The shop is the perfect stop for modern fabrics and the owner and staff there are beyond remarkable.  They are so helpful and I dare say they were as excited about my project as I was!  I could talk to those ladies for hours and their knowledge and experience shows.  If you are ever in the Cincinnati area and you sew or know someone who does...go to Sewn Studio.  You will not regret it.

The fabric is called Collage Dotty Bird in purple.  It also comes in tan and cream, which is so pretty.  It's a border print so the birds are on the bottom so I had to buy extra yardage...for another project :)    It's a neat fabric.  Some of the dots and bird wings look like newspaper print and the colors are a little more funky...not so bubble gum pink if you know what I mean.  Basically, I love this fabric!!
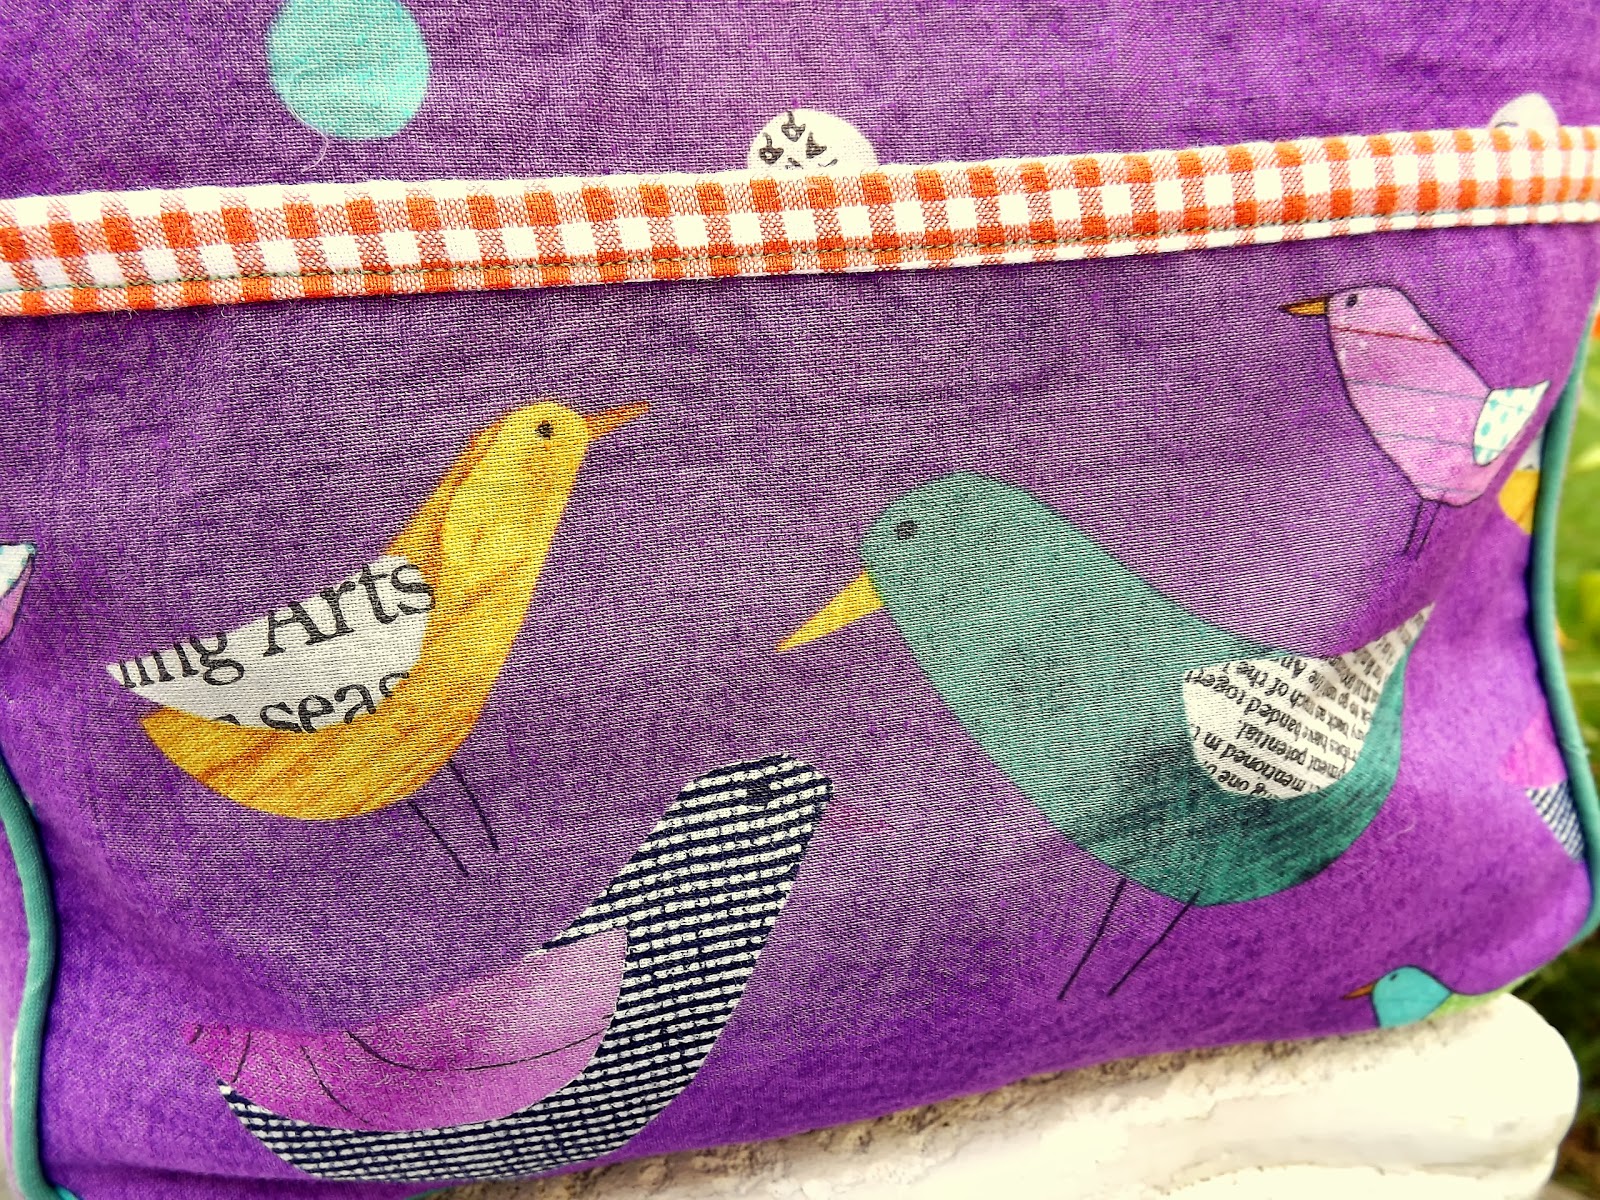


I paired it with a orange and white gingham...think creamcicle and that is the color it reads.   For the piping, which I made myself thanks to the help of Julie at Sewn Studio, I chose a beautiful teal cotton.  I'm telling you, I'm probably going back for more of that teal fabric.  It's so soft and has a sheen to it.  I can see a skirt for myself in that fabric. 

Yes. Ma'am.


The pattern I used is the Toddler Backpack from Made By Rae.  The pattern is really a beautiful basic pattern and it can be expanded for a school-aged child.  I added a front pocket to mine to highlight the birds on the fabric and lined it with the teal.


The straps were new for me.   I've never done anything like that but...I will be in the future! (hint, hint)


I added a lot of extra stitching to the bag, one for durability and two, for style.


I hand embroidered all of the name patches.  There are three in total, one on the front, one on the top....


...and one on the inside pocket as a tag.  I also embroidered a little heart on it!  So cute!


I thought the bag seemed a bit heavy when I went to photograph it...


So besides being lined in canvas for stability, it seems to make a very nice home for the entire royal family.


James to Sophia:  "I really like this bag...and the stitching is impeccable..."


Queen Miranda:  "Please!  I was a cobbler for royal sake!  Talk to me about stitching."


G really loves her backpack.  She loves that it's purple, she loves, LOVES that it has pockets...for various reasons...namely, the ridiculously real looking lizard.


That lizard is so creepy.

She loves that it's all hers and she can put it on by herself and she loves that Mommy made it for her.  I couldn't be happier with how it turned out and I am truly proud of myself.  It was easy in some ways and pretty tough in others and I think I did a pretty good job on this beauty.

Hand-made preschool backpack...COMPLETE!

Until next time...


Wednesday, October 10, 2012

Bella's Blossoms Free Giveaway!

**Giveaway is now closed**


What an exciting day!

Today, I have the pleasure of introducing our newest sponsor of Momma C Designs and I am hosting my very first Giveaway! 

And today's sponsored giveaway comes to us from...


My dear friend, Robin, over at Bella's Blossoms is giving away not one, not two, but THREE of her amazing crocheted blossoms.  These are so cute and look great as a stand-alone hair accessory or on one of her crocheted hats.

Take a look at some of her creations.  She doesn't just do blossoms. Check out all of her amazing products for sale at Bella's Blossoms.


I am thrilled to have Bella’s Blossoms as a sponsor and can’t wait to showcase more of the amazing goodies that come from such a talented woman.

If you would like a chance to win three beautiful crocheted blossoms, here's how to enter...

  Leave a comment telling me how you express your creativity   

♥  And if you are an eager beaver, be sure to like our Facebook pages  ♥


You have until 12pm Sunday, October 14th to enter.  I'll announce the winner on Monday.

Good luck and Until next time...


Thursday, December 15, 2011

Another Great Bow!!

Hello!  I made another bow last night.  This is actually one that I had started and then hated.  I had originally used the pink and grey plaid ribbon for the base but it's so flimsy, it just looked silly.  So, I went all out instead!  


I love the look of this bow.  It's a big one at 6 inches.  I think it is a show stopper.  I love the stack on this bow.   Once I get my camera cord I'm going to start putting up tutorials for the bows.  They are surprisingly easy to make.  I love how you can get a very new and interesting bow just by adding another layer or another ribbon.

I'm excited to complete this order.  The order is for a young lady who is participating in the "Adopt a Child" program.  All I know is that the two little girls love pink!  So they are getting two large bows and four small bows.  You can see the other bows I've made so far in the Christmas Bows post.

I can't wait to share with you the other bows that are to come.

Until then...


Shanna

Wednesday, December 14, 2011

Christmas Bows are on Sale!!!


Christmas Hair Bows


The holiday season is a time for pretty dresses, cute patent leather shoes and stockings.  But you have to have a pretty little bow on top.  I'm selling those pretty little bows on top.  They are always so fun to make.  I really got into making them for my daughter after never seeing what I liked.  So here are a few of the little beauties I have created.

I had a couple of orders for pink bows, but all are made to the clients specific color requirements.  I'm offering two different sizes; Large (6-inch) and Small (3-inch).  Large bows are $8, small bows are $5 for one and $8 for a pair.

The "Miss Put Together" bow is a 3-inch bow with two ribbons and small center embellishment. Would be very cute as a set with pigtails!
(All bows are made to your color specifications)

The "Christmas Princess" bow is a 3-inch bow with two ribbons (one will be sheer organza) with center embellishment. 
This is a very pretty bow.
(All bows are made to your color specifications)

The "Christmas Wrapping Bow" is a 6-inch bow with three different ribbons and center embellishment. Very fun bow!
(All bows are made to your color specifications)

Merry Christmas!  I love making bows and I'm happy to be able to make a ton of them this year.  I'll have more pictures to come.


Shanna

Thursday, November 3, 2011

Knitting Bag - It's finished!


She's a beauty!  What a fun little project.  Unfortunately, my brand new camera has suffered from a power surge and I can't get my pictures off to post the tutorial I was going to give.  However, a great friend, who also happens to be a professional photographer, was kind enough to take some amazing photos for me.

Her name is Karen of Karen Renee Photography.  This woman is mother to a spunky little girl who has one of the biggest, most infectious smiles I've ever seen.  Karen is so talented, as you will see.  She also has a great sense of humor and can always make me laugh.  The first night we ever met was at a MNO (mom's night out) at a local restaurant and she almost busted my gut.  If you get the chance, check out Karen's Facebook page and take a look at some of her most recent shoots.


The shoot was really fun.  We just went over to the Arch grounds and took the strollers "off road" to find a little spot among the trees.  The leaves were falling and the air was crisp and I think the bag looked perfect in the setting.


I love the bag hanging in the tree.  It's so pretty.  


The straps make the bag gather in the middle, adding some dimension.  If you took a look at the original pattern via the link on my "Busy, Busy, Busy" post then you will know that this bag looks completely different and I have added quite a few features.

The bag is very simple but it is so functional.  The bag itself is roomy and can hold quite a bit.  However, I only had a few things in it:  a ball of yarn, knitting needles, a knitting pattern I made and lipstick.

It's a comfy bag and the pattern on the fabric is to die for.  There are four roomy pockets and two yarn holders that you can also use as key holders.


Karen took amazing pictures and I'm so grateful because without them, I wouldn't even be able to post about this fantastic bag for my friend.  I can't wait for her feedback on it and I'll be sure to let everyone know what she thinks.

Thanks for stopping by.  It's on to toddler bedding from here and we've already had a slight hiccup...more about that later.

Oh, and Karen even took a picture of me!


I'd say it's a keeper!  Until next time...

Monday, October 17, 2011

BABY LEGS!!


Wow are these things stinkin' cute!  I love the fact that I can keep Claire's legs warm and I can still get to her diaper without completely disrobing her.  It's starting to get cold here in St. Louis so this will definately be a plus.

These baby legs are so easy to make and so much cheaper!  For one pair of really cute "baby legs" I would pay around $7 or $8 dollars...well, the ones that I liked at least.  For $8 I bought really cute knee high socks for little girls and made four pairs of baby legs!  That's a price I like.


So here we go.  First, lay the sock down flat on it's natural fold from the packaging.  Next, take siccors and cut off the toe and the heel.  On the heel, cut along one side and then cut straight. 


You may think that this will leave the sock with a peak but it actually leaves you with a nice little rectangular piece as you can see below.


Next, take the small piece and fold it inward with wrong sides together.  Pull the raw edges together.

Now, here you can do one of two things.  A) You can leave it as is to sew to the other piece, or B) you can cut one side in order to make the cuff smaller.  I went with option A but at the end of this tutorial I will tell you what to do for option B.


Now that you have your raw ends together with right sides facing out, slide the cuff onto the other end (long end) of the sock.  Again, bring the raw edges together.  Now do any wiggling you need to to make the ends nice and even and everything is laying correctly.


Next, sew down the raw edges taking care to capture all three edges.  Use a zigzag stitch and stretch out the fabric a little bit.  I suggest a little more than a 1/4" seam allowance as the knit in the sock likes to roll up just enough that anything less lends to missed fabric. 


This process literally takes about 5 minutes...maybe.  I did four pairs in about 45 minutes.  That's with taking pictures, changing Claire, feeding Claire and having a few bites of key lime pie to boot.  It also helped that I did all the socks in an assymbly line.


And here is sweet Claire in her brand new baby legs!  They are so cute and so is she!  And yes, she has two different colored socks on...


Grace had to come and give her little sister a sweet kiss.  I don't blame her!


So there you have it.  DIY baby legs on a friendly budget.  I think I am going to make a few pairs for Grace but I will make them out of adult socks.  I'll post the pics when I make them.


For option B, I made you a very fancy illustration of what to do...Ha!


Make sure you use a zig-zag stitch on step 2.  Also, you will have to stretch the material to make everything fit nice and neat as the cuff will be smaller than the other end piece.

That's it.  This was a fun little project.  I enjoyed making them and now I will be on the lookout for more socks for my little ones.  Oh, plural.  That's fun to say.

Thanks for visiting as always and I will be posting some more in the coming days.  Stay tuned!

Tuesday, June 7, 2011

Ruffled Onesies!

Photobucket


Pin It

This is a great gift!!  My mother is attending two baby showers this month and wanted me to make something really cute for the two little lady babies that will be born sometime in July.  I had seen a onesie with ruffles a few months earlier at The Cottage Home.  She made a set of onesies for a pair of twins and the boy's onesie is just darling.  Check out the link above to see what I mean.

The Cottage Home

For mine, I wanted to personalize the onesies so I used Freezer Paper to make a stenciled initial.  This is so easy and makes a very crisp line.

So here we go!  First, I hand drew my letter on the paper side of the freezer paper and used my exacto knife to cut it out.  Luckily, my letters were E and H, therefore, I didn't have any floating pieces (D, P, A, O, etc.). 


Next, I stabilized my fabric by ironing a sheet of freezer paper to the wrong side of my fabric.  This helps the fabric's fibers to stay put and also catches any paint that goes through the fabric.

I then ironed my letter (wax side down) to the right side of the fabric and presto, I have my stencil!


Now the freezer paper is fused to the fabric and the paint will not
bleed through the lines.  It's brilliant!!!

I then took a sponge and some fabric paint - I just used Tulip paint - and went to town!


Make sure you really get in the corners with the paint.


 The paint's directions said to let it dry for four hours, but I let it dry overnight just to be safe because at the four hour mark it was feeling tacky.

So once I peeled off the freezer paper, this is what the letter looked like.


Next I ironed double sided fusible web to the back of the painted fabric. This is great for applique and that's pretty much what I was going to be doing with this piece.  I needed to fuse it to the bib so it wouldn't move when I sewed on the ruffle.  By the way, I used lightweight fusible web.

I then used a template to trace out the shape on the back of the fusible web and cut both the fused web and fabric.  Perfect!


This is what it looked like completely ironed and fused to the onesie.

I then added the ruffle.  I used the same fabric for both the onesies since both mommies were using the same colors, lime and pink, for their nursery - Yay for me, I didn't have to buy fabric!


First off, onesies are quite difficult to work with.  Those itty-bitty things just don't want to cooperate.  There was one point when I really wanted to pull a Hulk Hogan and rip the thing right down the middle.  Yes....I did just reference a wrestling icon and No...I am not a fan.  Just know, my good friend Mrs. Olsen got me thinking about wrestling, so it's all her fault!  Love you, A!

For the ruffle, I cut a strip 2.5" wide and 18" long, folded and pressed it down the middle with right sides facing.  I then stitched the ends together with a 1/4" seam allowance.


I then turned the fabric right side out and ran a gathering stitch all the way down the raw edge and proceeded to gather the fabric.


I stitched the raw edge to the outside of the applique using a zig-zag stitch to try and clean up the massive amount of frays. 


I then turned to one of my favorites tools in my toolbox, and I do mean toolbox literally;  Its cute, it's purple and gray.  I pulled out the good ole' Wonder Tape!  Oh, it's the best thing ever.  It's a "double-sided transparent tape which can be stitched. Wonder Tape will not gum up on needle and completely disappears in first washing. An alternative to pinning or thread basting." per the description at Joann.com.  I couldn't have said it better so I quoted, and if I had tried to use my own words, I would have seemed like some love sick teenager.  I just love the stuff and I used my last bit on this project so I will be making a trip very soon.

I applied the wonder tape to my rick-rack to hold it down before stitching and of course, it worked like a charm!


And with that, all that was left to do was the back.  I basically did the same thing as the front.  On the bum I stitched the raw side of the two gathered ruffles (these were 2.5" x 20" ungathered) to the onesie and then for the top fabric stitched the rick-rack to the raw edge.  Here's what the finished product looks like!


This turned out so cute that I had to make matching bows for the little babes!


The girls will get one of each and they are lined all the way around instead of on just one side.  However, if the fabric still won't hold the little hairs, a strip of Velcro or a sliver of a make-up sponge glued to the inside bottom of the clip (I prefer the make-up sponge) will add extra support.  But I'm hoping that the fabric's friction will be enough.


So, now my mother has two baby shower gifts and I have a three extra onesies to now play with for my little bundle to come.  My next post will probably have another fun applique.  Or it will be the kitchen floor mats, or Grace's night gowns, or the shirt I just designed...as you can see, I have a ton of projects on my mind.  One thing I know, they will all make their way here.  Thanks for visiting!
Related Posts Plugin for WordPress, Blogger...