Showing posts with label Kiddie Crafts. Show all posts

Tuesday, August 6, 2013

DIY Fairy Garden!


What little girl doesn't want to play in a fairy garden!  Grace and I have been talking about making a fairy garden or fairy house for quite some time.  So the hunt has been on for something we could turn into a fairy garden or house.  We've seen bird houses and other structures that could have worked, but nothing ever really seemed right.  It all seemed too closed in.  But today...a stroke of genius!

My DIY fairy garden has a tree house with ladder, a swing, and a campfire with three stools and a bench.  I also made a chaise lounge and small awning along with some "poufs" for sitting.

Supplies for one phenomenal fairy garden...

-  1 Cereal box (that's my stroke of genius)
- Scissors
-  A pair of small hand held pruning shears 
-  Hot glue gun and glue...quite a few sticks
-  Elmers Glue
-  Spray Adhesive (optional)
-  Potting Soil (optional)
-  Paints and Paint brushes
-  Small sticks, leaves, acorns, rocks...pretty much anything you can find in your back yard


First and foremost, the scavenger hunt to find all the sticks and leaves and goodies was so much fun!  First, we have these giant Hickory trees and they are dropping these enormous hickory nuts.  I don't allow the girls to go under the trees right now because they seriously hurt when they fall on your head....but, they turned out to be great fairy boulders or poufs!  More on that later.

First!  Cut off one wide side of the cereal box.  Next hot glue the tabs and sides together to make a box.  In the front portion, cut an L shape into the cardboard, this makes your gate.  Although, I doubt fairies need gates, seeing as they can fly...but hey, my kiddos love the gate!


For the fence, take your pruning shears and start making some uniform cuts length wise on your twigs and sticks.  Some you can just break by hand, for others, I was very happy to have the pruning shears.  Below is a look at how it was going...then I clearly got distracted with the idea of making furniture.  But a word for the wise, if you look at the photo below, you will see that I started the tree house before completing the fence all the way around.  I probably wouldn't do this again because I had to be very selective to fill in those spaces for the fencing.  That part was kind of annoying and took a very long time.  Instead, I would complete the entire fence, then glue in additional parts and pieces in their proper spaces.

After you have made your fence, you can use spray adhesive on the floor and dust potting soil onto it.  After spreading it out, patting it gently and then dumping the remaining soil, just spray again and repeat.  When finished with the second coating of soil and getting rid of the extra, give it another good coat of the adhesive.  You don't have to do this.  You could paint the floor, make beams for it, glue beads or pebbles to it.  You can really use your imagination on all of it.

Filling in the gaps with twigs...not fun.  Also, the original swing...really cool.  It was also supporting the other corner of the tree house!

For the tree house, I simply took a rectangular piece of cardboard and glued leaves to the outside, turning the overhang under and gluing in place.  Next I made a small fence around three sides of the perimeter and hot glued two small plants for decoration.  Next, I figured out how high I wanted it to stand and cut three twigs to that length, my fourth was cut longer so I could anchor it into the corner and not take up floor space (you can see it a few pictures down).   Grace then white-washed the leaves to give them contrast and painted the railings. 


I then hot glued small pieces of twigs to one of the support beams for the tree house (cut using the pruning shears).


I then made a long support beam anchored to the front corner of the garden the the front corner of the tree house to make a swing.  My original swing was way cooler but it broke on the way out to put in the soil.  Once installed, paint it yellow and call it a happy day!


The swing was made from an old hickory nut section with twine hot glued beneath it and wrapped around the twig and secured with hot glue.


Next comes furniture!!


You can see the long anchor beam for the tree house right in the middle of the corner.


Stools are made with a small piece of cardboard (1"x1" roughly) and tiny twigs hot glued to it.  Next hot glue four small twigs to the bottom...then hand it over to your child to paint...done!

The camp fire is actually two parts.  First part is four twigs shaped like a rectangular tic-tac-toe...if that's understandable.  Glue in some tissue paper fire and the camp fire is done.  The bowl on top is two hickory nut sections glued and painted.  It's removable and deep enough so that Grace can put things in it and cook for her fairies.  Oh, and our fire is pink...because Grace said that's the color of fairy fire.  

...You learn something new every day.


Next, I made the chaise lounge.  I think it's my favorite.  Just take a rectangular piece of cardboard, fold one-third of it and glue a leaf to it.  Next hot glue some short legs and it is the cutest thing in the world!  We then gave it a little white wash with some pink highlights.

The awning is just as easy.  I took a rectangular piece of cardboard and covered it with leaves the same way I did with the tree house.  Then I cut out a small rectangle right in the middle that was wide enough to fit the corner support pole for the swing.  Next I hot glued a small twig (same as the ladder) to the pole and the height I wanted.  Attach the awning with hot glue at your desired angle on top of the twig with the support beam in the cutout and it such a nice shady spot for the fairies!


Oh, and don't forget the boulders...the poufs...or whatever they are.  Paint some nuts and put them in there for extra seating!


It's not too shabby!  I love how rustic it is but how colorful it still was able to be.  It really helped when we white washed the fence and put a little color on the gate.


I'm very happy with it and so is Grace.  She's waiting for me to make some fairies...but I'm kind of at a loss as to how to do that and not be overly breakable.  No biggie, I'm sure it will come to me!

Until next time...


Thursday, October 18, 2012

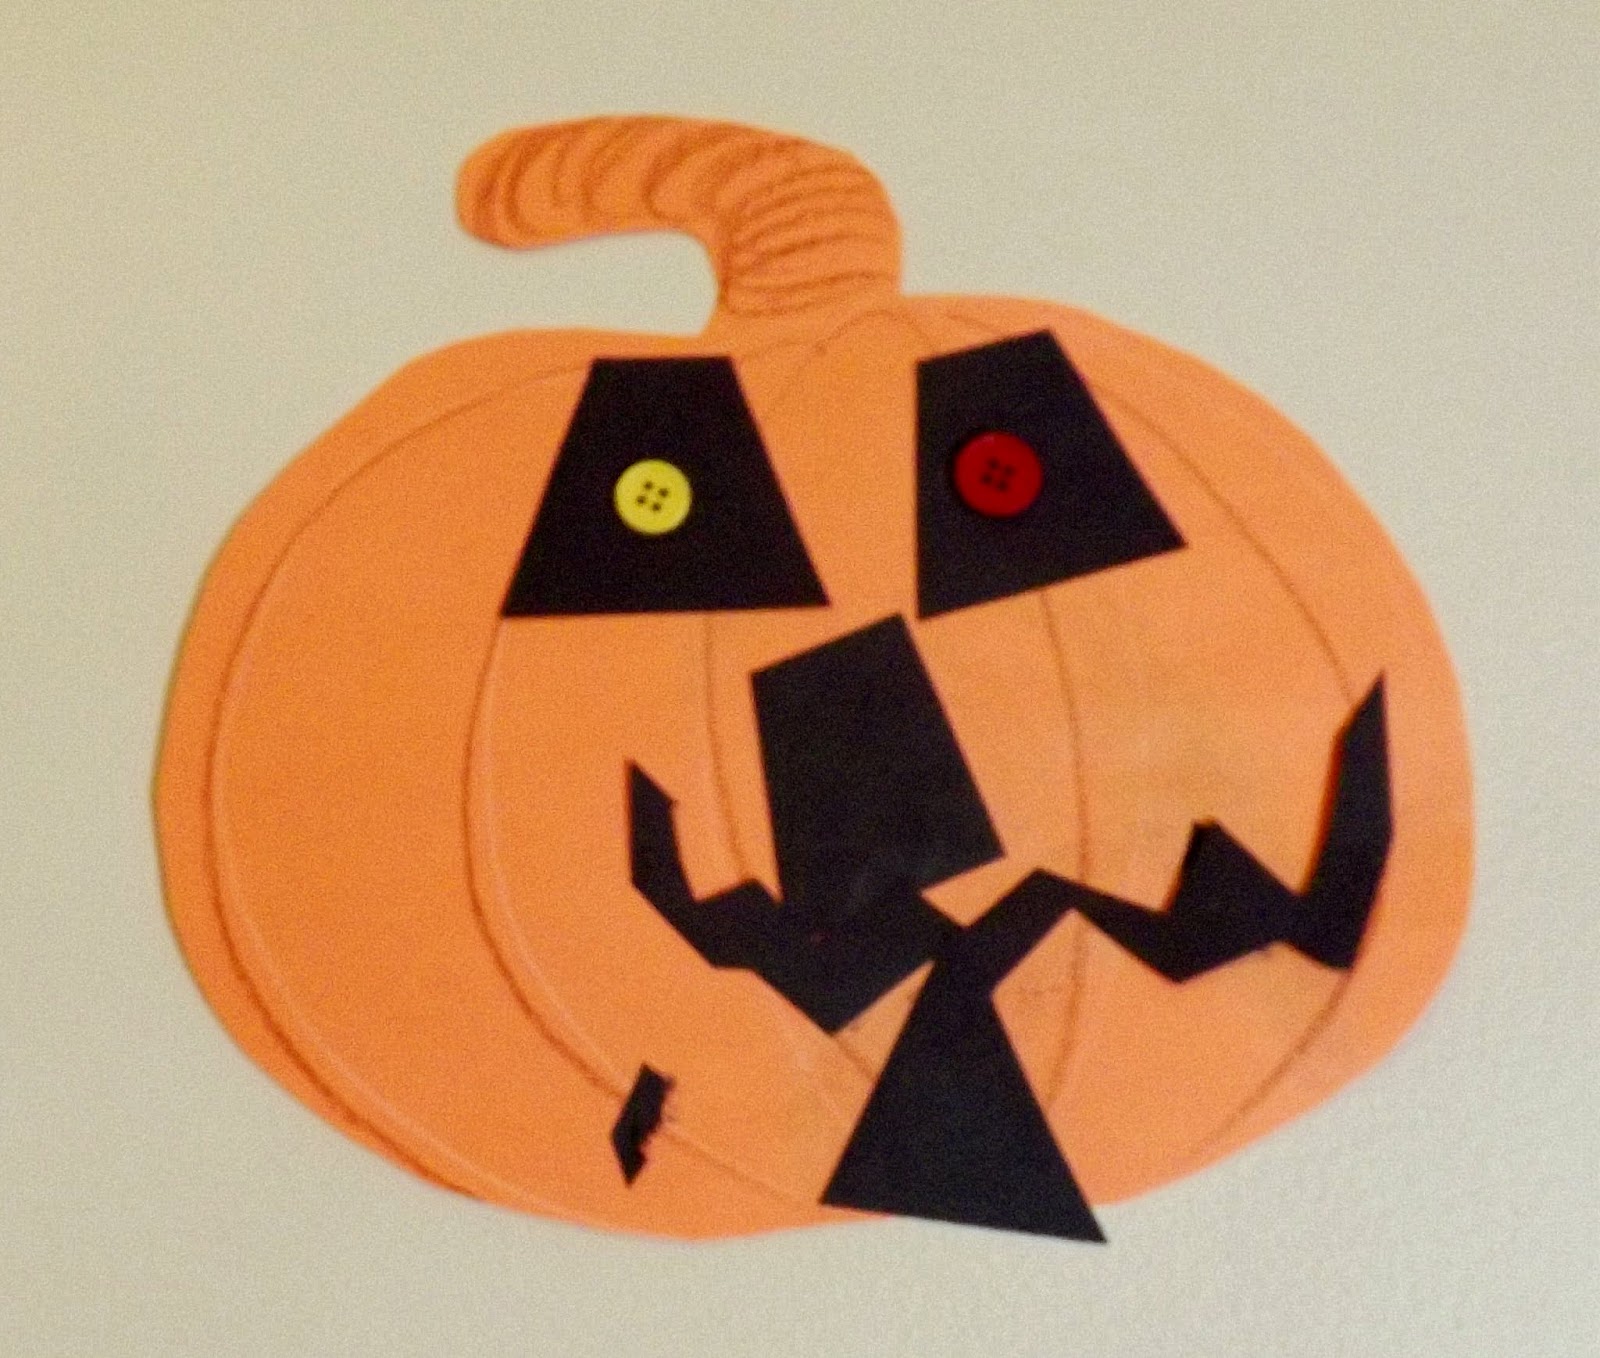
Not so Spooky Spooktacular Pumpkins!


Okay, so maybe they aren't very spooky...but they were fun; as fun could be!

What you will need in addition to the photo's list:

White pen, chalk or crayon
brown crayon
Exacto knife and a good blade
scissors
Office stapler and staples


First, draw a pumpkin.  If you are going to make multiple, staple that picture to a number of pages of the same paper.  (We used orange construction paper) and then cut out with a pair of scissors.  Now you have a bunch of pumpkins!

Draw in the lines with white pen, chalk or crayon, then color the stem with a brown crayon.  You can even go back over the white lines with the brown crayon.

Picture doesn't show that step...but you get my drift.)


Next, take some squares of black construction paper and draw some scary, funny, or happy teeth.  I found that using an Exacto knife was the best route for this step.  I was able to get some really funky teeth with the Exacto blade....and it went so much faster than scissors.

You could do the same as with the pumpkins to get multiples of the same mouth.  That would save time. too.


Next, cut a strip of black construction paper and cut out triangles with your scissors all the way down the strip.  They don't need to be perfect and you don't have to just do triangles.  

Next, present all the pieces, get a pumpkin for yourself and let the fun begin!

If you want to add some more fun, add some glitter, halloween stickers, and maybe even some cutout spiders!  You can do so much with this craft.

Oh what fun they are!  If you don't feel comfortable with your drawing skills or don't have any fake fall leaves, I've created three printables which can be cut out.  All you would need then are the buttons and glue.


I hope you have as much fun as we did making this craft.  Here are a few shots of what G and I created (I really only made one).


Poor guy...


I like the eyebrows on this fella.


Enjoy and until next time...


Linked up to...

Skip To My Lou

Wednesday, November 9, 2011

Wednesday Roundup: Kids Thanksgiving Table


Children’s Thanksgiving Table

I love Thanksgiving and it is my husband's favorite holiday.  And since this entire month's roundups are dedicated to Thanksgiving, I thought about some new traditions I would like to start for my own family.  

I grew up with a very large family.  We would all get together at my Uncle's, say a thankful prayer and we would have mountains of food (My cousin, Chris, usually had about three or four layers...and two plates).  We would play football in the yard and then we would have some more food!  

We always had a kids table, but since the event was so large, their wasn't a huge emphasis on decorating the table for the kiddos.  Not to mention that there was always more than ten kiddos running around, and at least 30 adults and teens!  It was big and it was always a challenge just to get all the food prepared, let alone make table decorations.

Here are a few table settings that range from super easy to a little more involved.  I love these craft ideas.  They are fun and personal.  Even if you are having several children running around your home this Thanksgiving, maybe you can find something here to make this Thanksgiving special for each one of them.

Enjoy!!


Top Row:  1.  Pilgrim Hat Crayon Holder  2.  Snack Pie (a personal favorite)  3.  Fall Tree Centerpiece
Bottom Row:  Entire place setting showing the Mayflower drink cup

1.  Turkey Leg Seat Saver  2.  Turkey Clip Fork Holder

I think the above is by far my favorite place setting.  I love the colors and the little touches are so creative.  You can find how to make each one at Fiskars.  I love the snack pie.  That is just an adorable idea, and very easy to pull off.  Another favorite is the Mayflower drink cup.  On my Internet crawl, I didn't find any other instances where the drinking cup pulled double duty as a decoration.  Very cute!


Napkin Holders

Napkin holders may not necessarily be on the radar for a kids table, but here are a couple of really cute ones.  The top is a button napkin ring that is made to mimic the look of corn.  All you need is some felt, Popsicle sticks, glue and buttons.  It's very simple.  You can find the full tutorial here.

The bottom napkin holder is a great way to add a touch of personalization for the kiddos and also lets them know where they are sitting!  I love double duty crafts!  You can find the tutorial here.


Snack Attack!

Kiddos love snacks and while they are waiting for their food to arrive, give them something to keep them in their seats.

1.  Turkey Snack Cup
This is very cute.  You can put anything in it and you can even personalize for a seat saver.

2.  Turkey Sucker Holder
You don't have to have suckers though!  What about long pretzels??

3.  Paper Plate Cornucopia
I LOVE, LOVE, LOVE this idea.  It's rustic, it's easy and when I saw it I didn't even have a clue that it was just a paper plate underneath some twine and a piece of manila rope.  I love this idea!

4.  Apple Turkey Place Card
This little craft pulls triple duty!  That's my kind of craft.  In the tutorial it says to glue the "head" to the apple, but you could glue the head to a paperclip and just stick it into the apple and then it is completely edible!  So that's decoration, place card and nutritious snack...yep, that's a winner!


Activities (And one more snack attack...)


I should have put the cute and simple snack cones with the others, but these three ideas are from the same lovely little blog, Lily's Laundry.  The snack cones were made out of paper she printed (which she offers as a free download!!)

The activity she chose for her table made me think of Grace.  She is very into beading right now and we do it every chance we get.  I love how each child has their own jar of beads with their name on it.  This is an adorable table.


You could also go for a cute little Thanksgiving place mat that...hold it...pulls double duty as an activity mat!!  Can you tell I'm a sucker for double duty?

The top mat has three different activities; spot the difference, a turkey maze and a picture to color.  You can download and print here.

The bottom mat is fun.  It's chalk cloth!  You can order it on Fabric.com, but Beverly of Flamingo Toes mentions that she thinks it is available at Joann's.  What a cute idea!


This Turkey Caddy is really easy to make.  All it takes is a Styrofoam ball (halved), card stock, googly eyes, glue and some brown paint.  Once you put the turkey body together you just stick the markers and color pencils in and voila!  It's another double duty creation - center piece and activity caddy!


This one doesn't necessarily have to count as an activity, but I just love the setting.  I found it at Hip Hip Hooray and it is actually a feature of another blogger.  It's very simple and rustic.  They used butcher paper for the table cloth and wrote by hand the checklist of what the kiddos ate.  In addition to the check list, a circle was drawn with a menu placed in the center.  They also made "I am thankful" wands that included statements such as, "I am thankful for my Grandma and Grandpa".  I love this table setting.  I find it very beautiful.


Chair Decorations

Chair decorations?  Well, why not?! Kiddos are notoriously clumsy creatures.  Something is going to get spilled or even broken.  Why not use the chair space to further decorate or personalize the experience.

The top picture comes from the same setting as above at Hip Hip Hooray.  This little bunting is the perfect way to tell your smaller guests where their seat is.  Then they can take it home and hang it on their bedroom walls.  How fun!

The middle picture is a simple felt chair cover.  This can actually be a no sew project.  You can even further personalize the covers by putting the child's name on it.

I love the bottom picture.  It's actually a rolled up woven place mat.  This one doesn't have great instructions, actually, hardly none.  However, use your imagination.  Hang something like this from the chair to hold little goodies, craft supplies or things the kiddos can take home.  It's a cute idea.

I hope you have enjoyed this Roundup and I hope you have gotten a few ideas for the kiddos that will be spending their Thanksgiving with you, or even just for your own.

Until next time...


Wednesday, November 2, 2011

Wednesday Roundup: Thanksgiving Kid Crafts


Hi there!  I'm starting something new on the blog that I hope you will enjoy.  It's called the Wednesday Roundup.  Every Wednesday I will feature a "Roundup" of different things.  It could be anything from cute handmade dresses, to different kinds of DIY chalkboards for kiddos.  Whatever the topic, there will definitely be a ton of fun images to look at and links to informative sites.  I'm very excited to start this weekly roundup as I have enjoyed many roundups on other favorite blogs.  I hope you enjoy mine as much as I have enjoyed theirs.

So here we go!  This weeks roundup features fun Thanksgiving Crafts for the Kiddos.  Thanksgiving is only three short weeks away and crafts for this time of year are always fun.  Filled with fall colors and everything turkey, here are a few crafts that you and the kiddos will enjoy.


Thankful Crafts


I love the hanging tree of thanks.  You could pre-cut leaf cutouts and have the kiddos decorate them even further.  I can even see expanding this idea to a larger piece of foam core to allow for more leaves of thanks.  If you have more than one kiddo, the thankful turkey sign is great!  Each kid can have their very own door sign describing all the things they are thankful for.


Family Fun Crafts


1.  Fall Hand Tree   2.  Pilgrim Finger Puppets

The Pilgrim Finger Puppets are really cute.  The site also has other printouts for Indians and turkeys.  I remember making Paper Plate Turkeys as a child and they were always really fun.  You could also cut out holes for eyes and mouth and make a turkey face mask!


I LOVE the Turkey Magnet!  I think this is going to be a craft for Grace and I.  Also, what better way to get rid of all that Halloween candy corn!  The Salt Dough Prints are my favorite craft idea so far and I can't wait to make these with Grace.  They will make for some great coasters around the home or even as a gift set to a loved one.  


Turkey Pinwheels!!  So cute!  And what kid doesn't love a good turkey hat.  I love the idea of turkey pins.  I know Grace would love to wear one.

Thank you for viewing my first roundup.  It was so much fun!  I love surfing the web and finding fun ideas for Grace and I to do together.  I hope you get some great ideas out this roundup and you have a ton of fun with your family making some festive Thanksgiving crafts.

Until next time...


Sunday, October 30, 2011

Busy, Busy, Busy!!!


Sewing with two has definitely been a challenge.  With that said.  I have done quite a bit lately, just haven't written about it.  So, in lieu of a long tutorial, I'm going to just give you an idea of what I have been up to.

First, I have been going crazy on Pinterest!  It's a blast and lately when the kiddos are napping (they are both napping at the same time, insane!!) I have been looking at great ideas posted on Pinterest and posting a few of my own.  You can follow my Pinterest posts below.

Follow Me on Pinterest


Thanks to Pinterest, I've gotten a ton of really great ideas for activity bags for Grace.  I put together a few this week.  We've got a matching game, Care Bear color cards (made from stickers G was randomly putting on a page and then I cut them out), spaghetti shaker for dexterity (Grace LOVES this game - she will sit forever playing it), open and close objects, shape puzzles, foam lacing shapes that I made, coloring fun, and sticker fun.

Spaghetti Shaker and home-made lacing shapes/colors

Shape puzzles and coloring fun

Sticker fun and Care Bear Color cards

Not pictured is the matching game and open/close bag

I've also got some small tubs that hold play-dough from a Melissa and Doug set that I'm thinking about putting in the activity set.  The activity grab bags I have seen have mostly been on the large side for those rainy/snowy days indoors.  I'm trying to keep mine very small so that I can take a few on our trips.  We took the open and close objects and the spaghetti shaker to a doctor's appointment on Tuesday and it made a world of difference.  She was quiet and occupied trying to figure out how to open a barrette, a miniature mailbox, another hair clip and other little items that opened and closed.  Usually it is very trying to entertain her in those situations and I don't like to pacify her with snacks.


It was one of those days where we weren't going anywhere and I had a very restless little two year old on my hands.  Grace had gotten hold of a clothespin and just ripped it apart.  She had been asking me to paint all day and the clothespin was already already wrecked so, why not make bunnies!  With the metal hinge off, just glue the two pieces together with a hot glue gun.  I originally used Tacky glue and it worked well.  It just took about 10-15 minutes to fully dry and it is easier to pull apart than the hot glue - but it works. 

I then took a piece of paper and cut out a small circle to glue on for the face.  My bunny faces are a little bit funny looking, I got impatient and didn't wait for the paint to dry and tried to draw the face anyway...the situation was getting sticky.  G was getting restless, little babe was hungry, and so was Daddy.  Here are a few pics of our fun little bunny and painting session.


Daddy and Claire with a pair of her home-made baby legs!!
 Look at that grumpy face!  SMOOOCH!

Grace loved the clothespin bunnies!  She played with them for the rest of the night.  The next morning however, she tore off the faces so I decided not to make anymore until I come up with a better face that she can't just rip off.  I have since bought the old-fashioned doll pins and I'll make some dolls with clothes made from scraps of fabric.  That tutorial will be about hand stitching.

I also have been making a bag for a dear friend.  She crochets faster than anyone I have ever seen and she just walks around the house dragging a ball of yarn, talking, taking care of the baby, picking up toys and petting the dog.  All while still crocheting!  It's really a sight to see.  She crochets beautiful flowers for headbands and barrettes through her business, Bella's Blossoms, named after her gorgeous daughter Bella.  Bella and Grace were born only five days apart and we have spent many hours together with the kiddos.  I found this knitting bag tutorial on one of my many internet idea crawls.  I took the basic tutorial and added a few more features such as extra pockets and key/yarn holders.  I say yarn holders because you can just thread the yarn through and when you need to "stuff and go", your yarn will not get muddled with the rest of the bags contents.  

I'm not finished with the bag, I ran out of pink thread right at the end!  However, all that is left to do is make the straps and sew the bottom of the casing as this bag conveniently cinches at the top.  Here are a few photos of the progress so far.


The fabric is so fun and pretty.  It is a kind of toile on a beautiful light blue cotton.  The images are in cream and brown.  I literally got this fabric at Hancock for...wait for it...50 cents a yard!!!  I was out for fabric on a different project and passed the clearance bin on the way to the counter.  I took a quick look and found this beauty.  There was about a yard and a half left and I grabbed it up...not having any idea what I was going to do with it but it was too pretty to pass up...and 75 cents!  This fabric is perfect for my friend as the scenes depict a mother and daughter in various settings such as shopping at a market, planting in the garden,  and the mother pushing the girl in a wagon and also helping her to skate.  When I started thinking about finally putting this bag together for her, I knew this fabric was just right.  It reminds me of my friend and how she is with her daughter, and how she was with mine.  She is a wonderful mother and a dear friend.  

For the lining I had some thick cotton that almost has the feel of a lightweight canvas.  It is perfect as it adds plenty of strength to the bag but doesn't make it super bulky.  I actually got it from the woman I'm making the bag for.  This thick cotton was the perfect creamy color to match the outside of the bag and it also maintains a wrinkly texture that I couldn't iron out.  But I love how it makes the bag look.

I used bright pink thread just give the bag fun contrast and a pop of color.  It has turned out very cute so far and I've had a good time making it, even with all the weird fiascos that came along with it...and there were quite a few, i.e., fabric issues, spilled soda, thread issues, burning myself with the iron, everything falling out of my sewing kit...and a few other spastic happenings.  This was all in a two night period and it was so strange.


As I said, I originally found this bag through a tutorial.  You can find the tutorial by clicking on the link to the left and navigating to the tutorial page and looking for the link for "Knitting Bag: Passionate Design".


I finally have the fabric for Grace's bedding!  It's stinkin' cute!  I can't wait to start making it but I have to wait for the same pink thread that I am using for the knitting bag, which by the way, I am definitely making one for myself!  There is so much room in it!


The solid blue will be the bottom of the duvet.
The bumble bee, floral and pink geometric will
serve as the top of the duvet.
The solid yellow will be the sheet and the solid
looking pink will serve as the bed skirt.

I hope I enjoy doing the bedding as much as I think I am going to.  This might be something more down the line.  So, as soon as the bag is finished, I will start on the bedding and I am ITCHING to get to it.


While on my shopping trip for the bedding fabric I found some really great Mickey Mouse themed paper!  Remember this picture?


This shoe box is about to be completely decked out in Mickey Mouse from the inside out.  I'm making Grace her very own Mickey Mouse Clubhouse for all of her "friends" as she calls them.

This paper is so cute.  All I need is some Modge Podge to glue down the paper.  I keep reading this is the best stuff in the world.  I hope so because Grace will just pull it off if she gets the chance, lol.

I'm going to cut out the photos of each character and
place them in the shoe box like photographs on a wall.

This is my favorite paper.  Going back to the
old-school Mickey Mouse!  Woot-Woot!

Ha!!

So, I've been busy and I'm going to be busy.  I'm very excited about my ongoing and upcoming projects.  I'm going to post more in the coming days as I am trying to increase my following so tell all your friends about my little blog and encourage them to follow my projects.  Leave comments and tell me what you like or don't like.  Also, feel free to give me some ideas.  I'm always looking for a new project for the girls or for my home...you should see my schematics on the fabric organizers I've got in the works!

Thanks for visiting and until next time...
Related Posts Plugin for WordPress, Blogger...