Showing posts with label Accessories. Show all posts

Monday, September 23, 2013

Preschool Backpack!


It's been a whirl-wind of a time here at the MCD house.  We've had family and friends over and I've been sewing and crafting a ton!  One of the most recent projects has been the oh so beloved backpack.

G started preschool this year!!!


And although G and I were super-duper excited about this little adventure...a certain little someone else, was not...


Poor Claire Bear.


But G and I couldn't have been happier!  It was time.  She is so beyond ready and I need a little more one-on-one time with my little pouty-lipped, fire-cracker of a two-year old.  Because believe it or not, the little baby doesn't require the most attention, it's G!  G won't play by herself to save her life!  And she's oh so sensitive, which I love, but it can be tough and can require a bit of time and a truck load of patience since I'm trying to raise a human being...not a hot mess.


 I just love that photo.

Since G was starting Preschool, we needed a backpack!  And when I say I looked, I mean I scoured the internet, looked at all the department stores and came up with only two that I even remotely wanted.

The first choice was this one from Joo of BaggyBags...


Needless to say, I was in love with this bag.  Unfortunately, no embroidery and we were required to have her name on the inside, outside and top of her bag.  This bag is just too pretty to do that to.

If you are looking for an amazing bag with beautiful neutral colors, classic shapes and clear-cut quality...Joo of BaggyBags is phenomenal.  I know I'm about to purchase something for myself from her...however, I can't choose which one I love the most.  She's that good.

Second choice and the one we almost got was from Pottery Barn.  The only reason we didn't get it was because I wouldn't have received it until the end of October!!!

Therefore, instead of letting G get swallowed by a slew of plastic and poly...I made the trepidatious decision to make her backpack.  *ooohhh....gasp*

I got a couple folks who asked "Are you crazy?" and "why?" and "Really?"

Yes...I'm kind of nuts sometimes.

But, let me tell you how wonderful this experience was.  This was by far my most complicated project I have ever taken on.  And I came out singing!

Take a look!


First, lets talk fabric.  This fabric is absolutely too cute!!!  I found it at my new favorite fabric shop, Sewn Studio.  The shop is the perfect stop for modern fabrics and the owner and staff there are beyond remarkable.  They are so helpful and I dare say they were as excited about my project as I was!  I could talk to those ladies for hours and their knowledge and experience shows.  If you are ever in the Cincinnati area and you sew or know someone who does...go to Sewn Studio.  You will not regret it.

The fabric is called Collage Dotty Bird in purple.  It also comes in tan and cream, which is so pretty.  It's a border print so the birds are on the bottom so I had to buy extra yardage...for another project :)    It's a neat fabric.  Some of the dots and bird wings look like newspaper print and the colors are a little more funky...not so bubble gum pink if you know what I mean.  Basically, I love this fabric!!
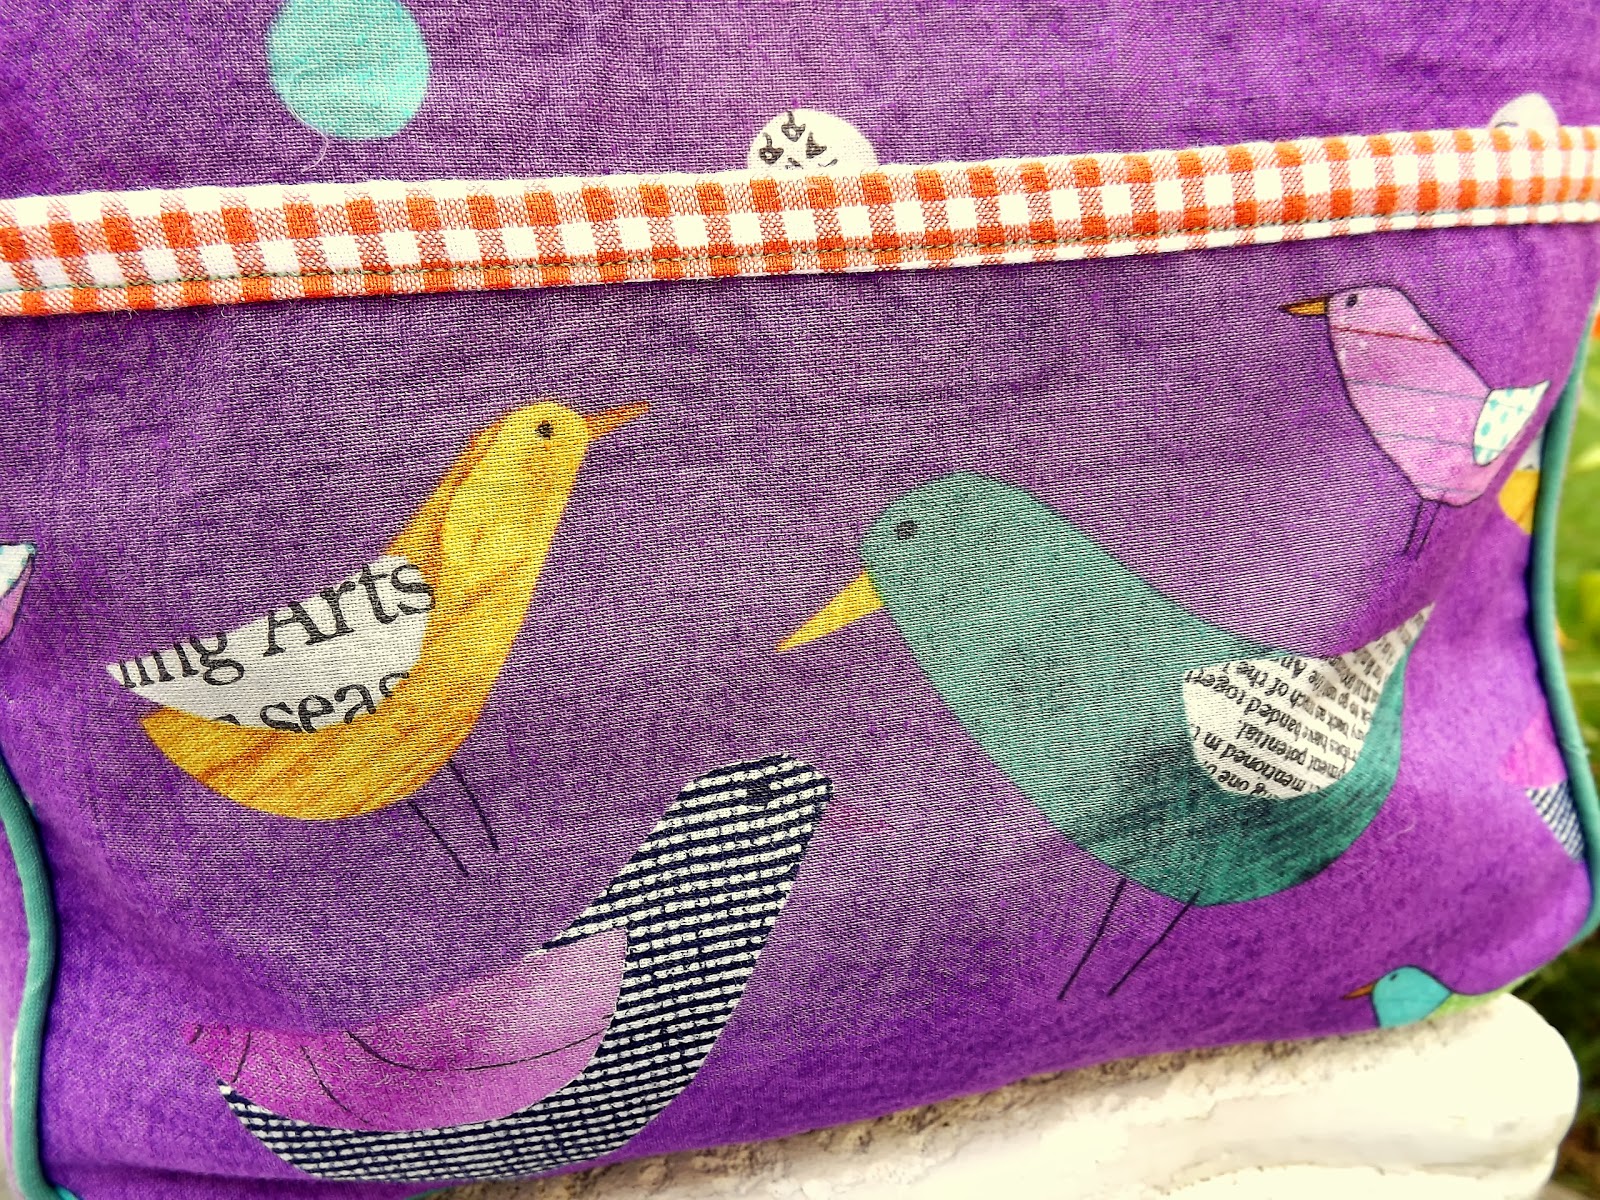


I paired it with a orange and white gingham...think creamcicle and that is the color it reads.   For the piping, which I made myself thanks to the help of Julie at Sewn Studio, I chose a beautiful teal cotton.  I'm telling you, I'm probably going back for more of that teal fabric.  It's so soft and has a sheen to it.  I can see a skirt for myself in that fabric. 

Yes. Ma'am.


The pattern I used is the Toddler Backpack from Made By Rae.  The pattern is really a beautiful basic pattern and it can be expanded for a school-aged child.  I added a front pocket to mine to highlight the birds on the fabric and lined it with the teal.


The straps were new for me.   I've never done anything like that but...I will be in the future! (hint, hint)


I added a lot of extra stitching to the bag, one for durability and two, for style.


I hand embroidered all of the name patches.  There are three in total, one on the front, one on the top....


...and one on the inside pocket as a tag.  I also embroidered a little heart on it!  So cute!


I thought the bag seemed a bit heavy when I went to photograph it...


So besides being lined in canvas for stability, it seems to make a very nice home for the entire royal family.


James to Sophia:  "I really like this bag...and the stitching is impeccable..."


Queen Miranda:  "Please!  I was a cobbler for royal sake!  Talk to me about stitching."


G really loves her backpack.  She loves that it's purple, she loves, LOVES that it has pockets...for various reasons...namely, the ridiculously real looking lizard.


That lizard is so creepy.

She loves that it's all hers and she can put it on by herself and she loves that Mommy made it for her.  I couldn't be happier with how it turned out and I am truly proud of myself.  It was easy in some ways and pretty tough in others and I think I did a pretty good job on this beauty.

Hand-made preschool backpack...COMPLETE!

Until next time...


Monday, October 17, 2011

BABY LEGS!!


Wow are these things stinkin' cute!  I love the fact that I can keep Claire's legs warm and I can still get to her diaper without completely disrobing her.  It's starting to get cold here in St. Louis so this will definately be a plus.

These baby legs are so easy to make and so much cheaper!  For one pair of really cute "baby legs" I would pay around $7 or $8 dollars...well, the ones that I liked at least.  For $8 I bought really cute knee high socks for little girls and made four pairs of baby legs!  That's a price I like.


So here we go.  First, lay the sock down flat on it's natural fold from the packaging.  Next, take siccors and cut off the toe and the heel.  On the heel, cut along one side and then cut straight. 


You may think that this will leave the sock with a peak but it actually leaves you with a nice little rectangular piece as you can see below.


Next, take the small piece and fold it inward with wrong sides together.  Pull the raw edges together.

Now, here you can do one of two things.  A) You can leave it as is to sew to the other piece, or B) you can cut one side in order to make the cuff smaller.  I went with option A but at the end of this tutorial I will tell you what to do for option B.


Now that you have your raw ends together with right sides facing out, slide the cuff onto the other end (long end) of the sock.  Again, bring the raw edges together.  Now do any wiggling you need to to make the ends nice and even and everything is laying correctly.


Next, sew down the raw edges taking care to capture all three edges.  Use a zigzag stitch and stretch out the fabric a little bit.  I suggest a little more than a 1/4" seam allowance as the knit in the sock likes to roll up just enough that anything less lends to missed fabric. 


This process literally takes about 5 minutes...maybe.  I did four pairs in about 45 minutes.  That's with taking pictures, changing Claire, feeding Claire and having a few bites of key lime pie to boot.  It also helped that I did all the socks in an assymbly line.


And here is sweet Claire in her brand new baby legs!  They are so cute and so is she!  And yes, she has two different colored socks on...


Grace had to come and give her little sister a sweet kiss.  I don't blame her!


So there you have it.  DIY baby legs on a friendly budget.  I think I am going to make a few pairs for Grace but I will make them out of adult socks.  I'll post the pics when I make them.


For option B, I made you a very fancy illustration of what to do...Ha!


Make sure you use a zig-zag stitch on step 2.  Also, you will have to stretch the material to make everything fit nice and neat as the cuff will be smaller than the other end piece.

That's it.  This was a fun little project.  I enjoyed making them and now I will be on the lookout for more socks for my little ones.  Oh, plural.  That's fun to say.

Thanks for visiting as always and I will be posting some more in the coming days.  Stay tuned!

Sunday, May 8, 2011

Hair Bow Organizer - Part I


Grace has a ton of bows, and I have lost quite a few of those bows.  I keep them in the top drawer of her bureau in a very small box.  This box has long since overflowed and it's really hard to see what I have and to keep them from getting mixed into her socks and hosiery.  Hence, the hair bow organizer. 

I had had the idea to make one for quite a while and in doing my research I came across many a tutorial on such organizers.  I found one that I really liked because of the finished look of it, however, when I went to retrieve the site so I could link it, I couldn't find it.  I thought I saved it but I clearly didn't.  So I'll go forward, but when I find it, I'll come back and give credit where credit is due.

First, let me start by saying this is part one of this project because my family might be moving and I might change the entire color scheme of Grace's room.  So, I didn't paint the frame as I originally intended so it's a tad bit unfinished, but I needed the organizer bad and besides, part two will be really fun as I'll paint and decorate the frame to give it some more pizazz!  But for now, it's pure functionality at it's best.

Here are the materials you will need to complete this project:


  • Picture Frame with Glass - size of your choosing
  • Fabric - 1/2 Yard is plenty if you would like to have some left overs
  • Coordinating Ribbon - 9ft or more
  • Hot Glue Gun and Glue Sticks
  • Scissors
  • Fabric Marking Pen
If you want to finish the frame, do that first and you will need paint, any decorative items you wish to use and the hot glue gun.  Go wild!

Just a hint, grab your frame from a local thrift store or use an old one that you would like to re-purpose.  I got mine at Goodwill for $15.  It's a large frame at a finished size of 19 1/2" x 23 1/2".  I would have probably paid close to $30 maybe $40 if I had bought it at any retail store.  It's a great frame and very sturdy so I feel I got a great deal.

First, remove the backing from the frame and pull out the glass.  Take your fabric and place it under the glass.  Cut the fabric so that there is at least 1" overage.  I say "at least" because if your fabric is like mine, checked, then you might have to do some maneuvering to make everything line up properly.

Next, on one side, hot glue the corners down first.  Then continue on down the side to reach the other corner.


Next, go to the opposite side and do the same thing, pulling tightly before gluing down your corners (watch your pattern if you have one).  Move on to the other two sides and glue down.  You should finish to have a nice covered piece of glass.


Next, measure your glass and add 2".  Cut your ribbon to that length.  Cut however many pieces your want.  I cut five and I was going to add two more strips to go perpendicular to the other five, but I ran out of ribbon.  Boo!  Lesson learned.


On one side measure and mark with a fabric pen at even intervals where you want your ribbon to be placed.  Do the same for the opposite side to have straight pieces of ribbon in the end.

Take the ribbon and with right side facing the floor, put it on the fabric side of your glass.  Take the ribbon at your marked spots and hot glue it down.


Put the glass back into the frame, decorated or not, and replace the backing.  And Voila!!!  Now you have a beautiful hair bow organizer to easily access your child's easy to lose hair bows and it makes quite the pretty picture in your child's room.


And now, for a little Mother's Day cannoli...YUM!


I don't know when I'll decorate the frame, but when I do, you can be sure it will be posted and will be very fun!
Related Posts Plugin for WordPress, Blogger...