Monday, September 23, 2013

Preschool Backpack!


It's been a whirl-wind of a time here at the MCD house.  We've had family and friends over and I've been sewing and crafting a ton!  One of the most recent projects has been the oh so beloved backpack.

G started preschool this year!!!


And although G and I were super-duper excited about this little adventure...a certain little someone else, was not...


Poor Claire Bear.


But G and I couldn't have been happier!  It was time.  She is so beyond ready and I need a little more one-on-one time with my little pouty-lipped, fire-cracker of a two-year old.  Because believe it or not, the little baby doesn't require the most attention, it's G!  G won't play by herself to save her life!  And she's oh so sensitive, which I love, but it can be tough and can require a bit of time and a truck load of patience since I'm trying to raise a human being...not a hot mess.


 I just love that photo.

Since G was starting Preschool, we needed a backpack!  And when I say I looked, I mean I scoured the internet, looked at all the department stores and came up with only two that I even remotely wanted.

The first choice was this one from Joo of BaggyBags...


Needless to say, I was in love with this bag.  Unfortunately, no embroidery and we were required to have her name on the inside, outside and top of her bag.  This bag is just too pretty to do that to.

If you are looking for an amazing bag with beautiful neutral colors, classic shapes and clear-cut quality...Joo of BaggyBags is phenomenal.  I know I'm about to purchase something for myself from her...however, I can't choose which one I love the most.  She's that good.

Second choice and the one we almost got was from Pottery Barn.  The only reason we didn't get it was because I wouldn't have received it until the end of October!!!

Therefore, instead of letting G get swallowed by a slew of plastic and poly...I made the trepidatious decision to make her backpack.  *ooohhh....gasp*

I got a couple folks who asked "Are you crazy?" and "why?" and "Really?"

Yes...I'm kind of nuts sometimes.

But, let me tell you how wonderful this experience was.  This was by far my most complicated project I have ever taken on.  And I came out singing!

Take a look!


First, lets talk fabric.  This fabric is absolutely too cute!!!  I found it at my new favorite fabric shop, Sewn Studio.  The shop is the perfect stop for modern fabrics and the owner and staff there are beyond remarkable.  They are so helpful and I dare say they were as excited about my project as I was!  I could talk to those ladies for hours and their knowledge and experience shows.  If you are ever in the Cincinnati area and you sew or know someone who does...go to Sewn Studio.  You will not regret it.

The fabric is called Collage Dotty Bird in purple.  It also comes in tan and cream, which is so pretty.  It's a border print so the birds are on the bottom so I had to buy extra yardage...for another project :)    It's a neat fabric.  Some of the dots and bird wings look like newspaper print and the colors are a little more funky...not so bubble gum pink if you know what I mean.  Basically, I love this fabric!!
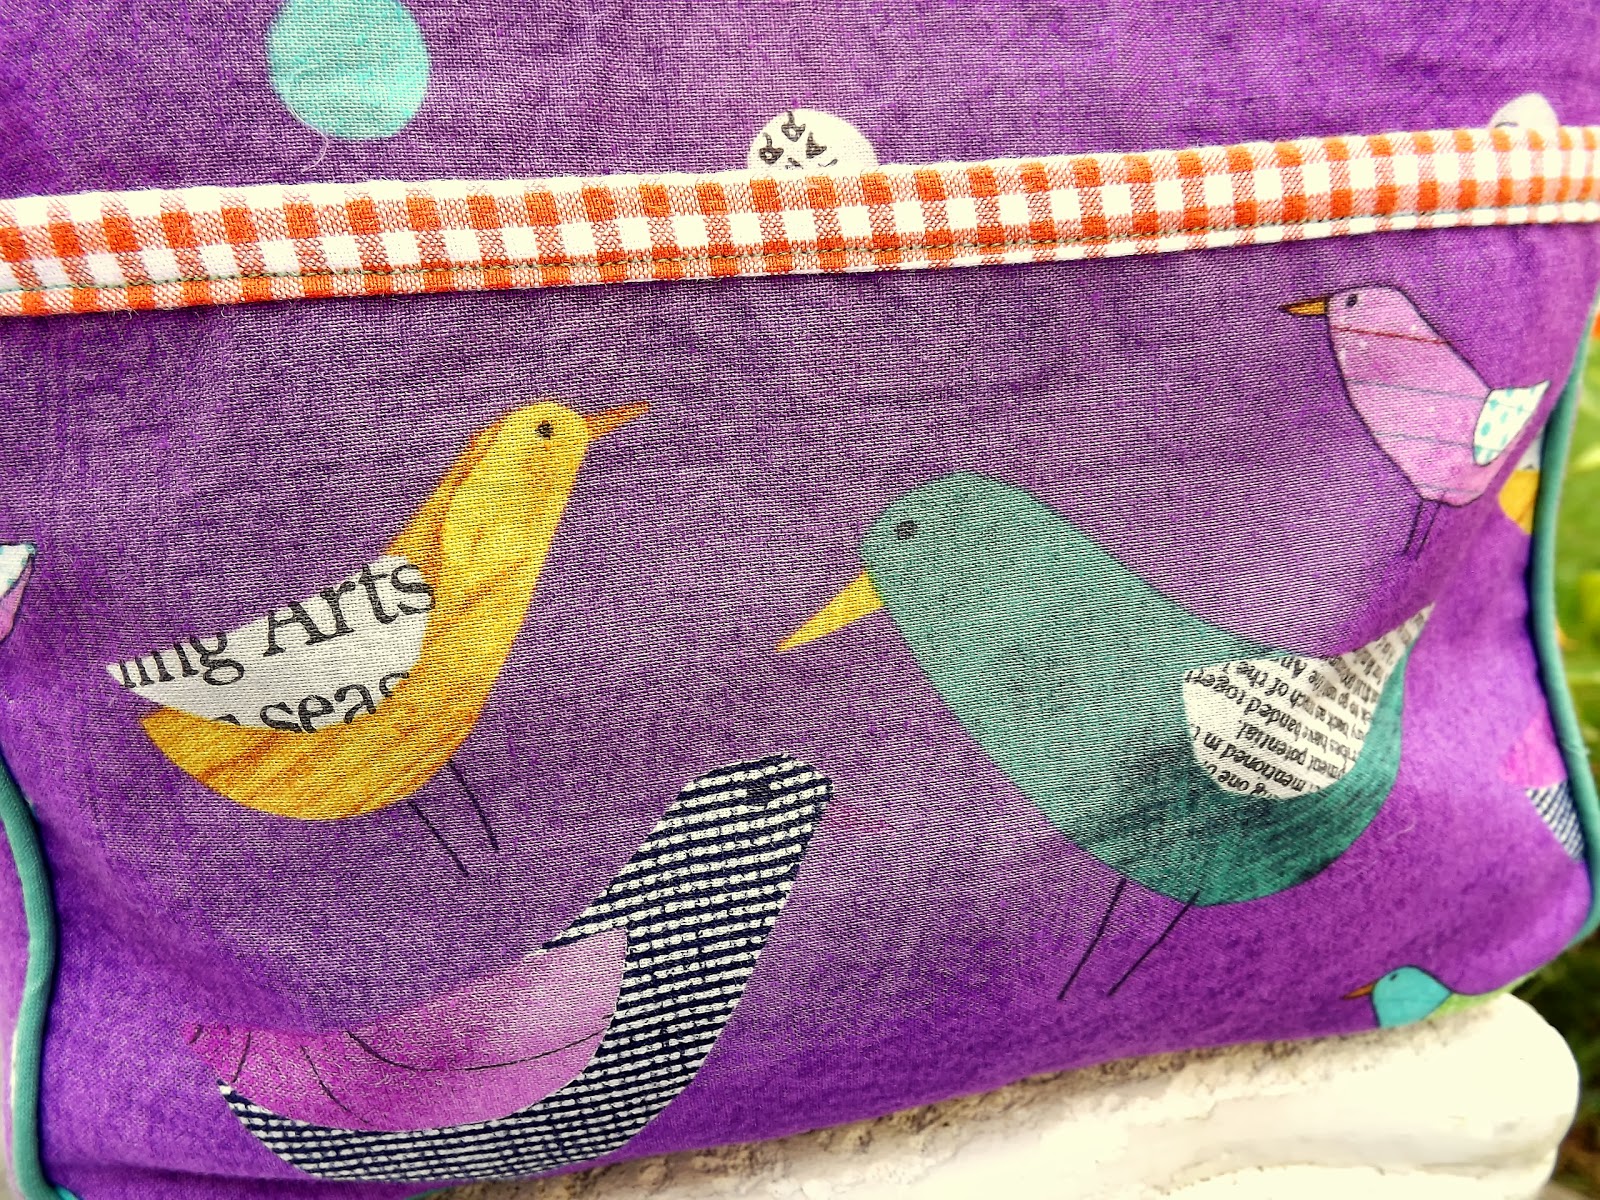


I paired it with a orange and white gingham...think creamcicle and that is the color it reads.   For the piping, which I made myself thanks to the help of Julie at Sewn Studio, I chose a beautiful teal cotton.  I'm telling you, I'm probably going back for more of that teal fabric.  It's so soft and has a sheen to it.  I can see a skirt for myself in that fabric. 

Yes. Ma'am.


The pattern I used is the Toddler Backpack from Made By Rae.  The pattern is really a beautiful basic pattern and it can be expanded for a school-aged child.  I added a front pocket to mine to highlight the birds on the fabric and lined it with the teal.


The straps were new for me.   I've never done anything like that but...I will be in the future! (hint, hint)


I added a lot of extra stitching to the bag, one for durability and two, for style.


I hand embroidered all of the name patches.  There are three in total, one on the front, one on the top....


...and one on the inside pocket as a tag.  I also embroidered a little heart on it!  So cute!


I thought the bag seemed a bit heavy when I went to photograph it...


So besides being lined in canvas for stability, it seems to make a very nice home for the entire royal family.


James to Sophia:  "I really like this bag...and the stitching is impeccable..."


Queen Miranda:  "Please!  I was a cobbler for royal sake!  Talk to me about stitching."


G really loves her backpack.  She loves that it's purple, she loves, LOVES that it has pockets...for various reasons...namely, the ridiculously real looking lizard.


That lizard is so creepy.

She loves that it's all hers and she can put it on by herself and she loves that Mommy made it for her.  I couldn't be happier with how it turned out and I am truly proud of myself.  It was easy in some ways and pretty tough in others and I think I did a pretty good job on this beauty.

Hand-made preschool backpack...COMPLETE!

Until next time...


Tuesday, August 6, 2013

DIY Fairy Garden!


What little girl doesn't want to play in a fairy garden!  Grace and I have been talking about making a fairy garden or fairy house for quite some time.  So the hunt has been on for something we could turn into a fairy garden or house.  We've seen bird houses and other structures that could have worked, but nothing ever really seemed right.  It all seemed too closed in.  But today...a stroke of genius!

My DIY fairy garden has a tree house with ladder, a swing, and a campfire with three stools and a bench.  I also made a chaise lounge and small awning along with some "poufs" for sitting.

Supplies for one phenomenal fairy garden...

-  1 Cereal box (that's my stroke of genius)
- Scissors
-  A pair of small hand held pruning shears 
-  Hot glue gun and glue...quite a few sticks
-  Elmers Glue
-  Spray Adhesive (optional)
-  Potting Soil (optional)
-  Paints and Paint brushes
-  Small sticks, leaves, acorns, rocks...pretty much anything you can find in your back yard


First and foremost, the scavenger hunt to find all the sticks and leaves and goodies was so much fun!  First, we have these giant Hickory trees and they are dropping these enormous hickory nuts.  I don't allow the girls to go under the trees right now because they seriously hurt when they fall on your head....but, they turned out to be great fairy boulders or poufs!  More on that later.

First!  Cut off one wide side of the cereal box.  Next hot glue the tabs and sides together to make a box.  In the front portion, cut an L shape into the cardboard, this makes your gate.  Although, I doubt fairies need gates, seeing as they can fly...but hey, my kiddos love the gate!


For the fence, take your pruning shears and start making some uniform cuts length wise on your twigs and sticks.  Some you can just break by hand, for others, I was very happy to have the pruning shears.  Below is a look at how it was going...then I clearly got distracted with the idea of making furniture.  But a word for the wise, if you look at the photo below, you will see that I started the tree house before completing the fence all the way around.  I probably wouldn't do this again because I had to be very selective to fill in those spaces for the fencing.  That part was kind of annoying and took a very long time.  Instead, I would complete the entire fence, then glue in additional parts and pieces in their proper spaces.

After you have made your fence, you can use spray adhesive on the floor and dust potting soil onto it.  After spreading it out, patting it gently and then dumping the remaining soil, just spray again and repeat.  When finished with the second coating of soil and getting rid of the extra, give it another good coat of the adhesive.  You don't have to do this.  You could paint the floor, make beams for it, glue beads or pebbles to it.  You can really use your imagination on all of it.

Filling in the gaps with twigs...not fun.  Also, the original swing...really cool.  It was also supporting the other corner of the tree house!

For the tree house, I simply took a rectangular piece of cardboard and glued leaves to the outside, turning the overhang under and gluing in place.  Next I made a small fence around three sides of the perimeter and hot glued two small plants for decoration.  Next, I figured out how high I wanted it to stand and cut three twigs to that length, my fourth was cut longer so I could anchor it into the corner and not take up floor space (you can see it a few pictures down).   Grace then white-washed the leaves to give them contrast and painted the railings. 


I then hot glued small pieces of twigs to one of the support beams for the tree house (cut using the pruning shears).


I then made a long support beam anchored to the front corner of the garden the the front corner of the tree house to make a swing.  My original swing was way cooler but it broke on the way out to put in the soil.  Once installed, paint it yellow and call it a happy day!


The swing was made from an old hickory nut section with twine hot glued beneath it and wrapped around the twig and secured with hot glue.


Next comes furniture!!


You can see the long anchor beam for the tree house right in the middle of the corner.


Stools are made with a small piece of cardboard (1"x1" roughly) and tiny twigs hot glued to it.  Next hot glue four small twigs to the bottom...then hand it over to your child to paint...done!

The camp fire is actually two parts.  First part is four twigs shaped like a rectangular tic-tac-toe...if that's understandable.  Glue in some tissue paper fire and the camp fire is done.  The bowl on top is two hickory nut sections glued and painted.  It's removable and deep enough so that Grace can put things in it and cook for her fairies.  Oh, and our fire is pink...because Grace said that's the color of fairy fire.  

...You learn something new every day.


Next, I made the chaise lounge.  I think it's my favorite.  Just take a rectangular piece of cardboard, fold one-third of it and glue a leaf to it.  Next hot glue some short legs and it is the cutest thing in the world!  We then gave it a little white wash with some pink highlights.

The awning is just as easy.  I took a rectangular piece of cardboard and covered it with leaves the same way I did with the tree house.  Then I cut out a small rectangle right in the middle that was wide enough to fit the corner support pole for the swing.  Next I hot glued a small twig (same as the ladder) to the pole and the height I wanted.  Attach the awning with hot glue at your desired angle on top of the twig with the support beam in the cutout and it such a nice shady spot for the fairies!


Oh, and don't forget the boulders...the poufs...or whatever they are.  Paint some nuts and put them in there for extra seating!


It's not too shabby!  I love how rustic it is but how colorful it still was able to be.  It really helped when we white washed the fence and put a little color on the gate.


I'm very happy with it and so is Grace.  She's waiting for me to make some fairies...but I'm kind of at a loss as to how to do that and not be overly breakable.  No biggie, I'm sure it will come to me!

Until next time...


Wednesday, April 3, 2013

Original Painting Begins!!!

Hello!  Voting has ending and with the combined votes from Momma C Designs and Facebook, you all voted for an original painting.  I'm actually thrilled with the choice!  I've been itching to do a painting for about a year now but our living situations kind of hindered that.  Moving a lot does not necessarily lend itself to a ton of creativity in the way of painting...at least not for me.

Below is the AWFUL painting that we found in the house when we moved in.


It's dark, muddled.  It's just plain ugly!  But, it's big!  I knew right away that I would want to reuse it.  But first, I've got to get rid of that hideous painting.  Introducing, Liquitex Gesso!  I love this stuff.  I found it quite a few years back and have used it on all of my paintings prior to starting.  It gives you a great base to work with...especially with acrylic paint, which is what I'm choosing to use for this project.  When you just start painting on a canvas, the paint really soaks into it so this gives it a barrier and a smoother surface.  It also works to hide previous work if you are reusing a canvas...just like in my case!

You can find this at Michael's Craft Store, and pretty much anywhere else including online.


Look  how thick this stuff is.  It's completely opaque and the coverage is phenomenal so a little goes a long way...And yes, I'm doing this on the hood of my car.


Below is the coverage just from that little amount I put on.  You can see that it completely covered the darkest area of the painting (although I did give it a second coat later...just for my own piece of mind).


So, I finished up with the gesso and then went to work on a general draft.  I love stripes and that's what I was going for with the background but then I went with the idea of creating a planked wood background for dimension...so that's where I'm going.  You can at least get the general orientation of the painting with the sketch.  I'm also thinking about changing Grace's line of site to look at me...or, the viewer if you really want to get technical.


So, there you have it!  Work has begun and I'm so excited to do it.  I'll keep you posted as I go along with little tips and tricks.  Thank you for voting and I can't wait to hear your comments!

Until next time...


Thursday, March 28, 2013

Vote on the Next Project!!

Hi there everyone!  Okay!!!  So what should the next project be?


From Left to Right...

 -  A Three cubby bookshelf for the playroom

 -  Farmhouse doll bed (Sandy has been needing a bed for quite a while)

 -  Original painting utilizing an old canvas that was here when we moved in and depicting the scene of my two lovies.

 -  Handmade knitted washcloths from Purlbee.  We seem to be in need of some new ones...so why not make them.  I made one a long time ago and I love the feel of it.


VOTE NOW!!

Look to the right of your screen and find the Next Project Poll.  You can choose multiple projects if you are not sure which project you like the most.

Poll ends Friday (March 29th) at 12pm.  Work on projects will begin next week!

I can't wait to see what project you choose!


Until next time...


Tuesday, March 26, 2013

A New Vanity For A New House!

Hello!  It's been five months since my last post!!!

WOW!  is all I have to say.  Sad, but true.  We've moved again from Columbus, Ohio to Cincinnati, Ohio.  I'll spare you all the details, save for one.  I was not thrilled.  In fact, I was so down about moving, that I stopped blogging.  I didn't talk to friends for a while.

I felt like I was finally settling into a place and then, here we go again!  Our move to Cincinnati marks the fourth move in three years.  I was being ripped from friends and a house that I really loved.

But...God works wonders.  Our new house, lovingly dubbed The DJ House, is my favorite home I've lived in thus far.  The previous owners did a phenomenal job on the place.  Photos will be uploaded soon...now that we are moved in and there aren't boxes in every nook and cranny!

However, I did need to add a vanity.  So here she is in all her glory!


I know, it's not much.  But before, it was just a three sided alcove right next to my closet.  Now, it's a perfect spot for my makeup, jewelry and a pretty little mirror I got at a garage sale back in Columbus for $1!!

Next is a multitude of things for this space.

The mirror is getting painted Aubusson Blue from Annie Sloan's Chalk Paint line.


It will then get a nice rub and buff of gold on it's pretty edges.

Rub-N-Buff - Grecian Gold

I also need a new light fixture.  The one up there now looks like a weird clam shell.  I'd like something along these lines.


You can kind of see the route I'm going just by looking at the lamps.  A little regal, a little glitz with some interesting detail.  I think my least favorite is the very top one, but I really love the glass on it.  The bottom one would have to be three or four in a row, but I LOVE the star burst.  Very playful!

Then, I need ruffles!  I'm going to put a shelf below the vanity and I would like to hide that if I could.  Below are some ideas I liked.

Grand Design Co.


Anthropologie

I like the Anthropologie look, although the ones shown are curtains, but that's an easy DIY.

I also have to finish my chair, which I don't have a picture of.  However, below is a similar one.


That is pretty much the exact chair, minus a few details and a very much needed seat.  I need a jig-saw to cut out a seat to reupholster it.  But, my little cane-back chair cost me zilcho dinero!  I was out running one day and saw that little baby on the side of someone's house.  Luckily my Spanish is decent enough that I was able to communicate that I would like to have the chair and the lovely couple let me take it!

It's beautiful!  It just doesn't have a seat yet!

Along with accessorizing and all the other little tid-bits I mentioned.  This project is well underway!

However, the hideous wallpaper will have to wait.  I'm not ready for it yet.


Can't you see how pretty this little spot is going to be?!?!

Until next time...hopefully not five months down the line...


Related Posts Plugin for WordPress, Blogger...